Showing posts with label Tutorial. Show all posts

30 August 2012

Party, Karamu, Fiesta, Forever,...

Now that I have that song stuck in your head, let's make a piñata.  This was my inspiration, but of course, I had to invent something penguin-ish, so I improvised.  I will say this, though:  I will never buy a piñata again.  I used some junk I had around the house, and saved myself about $15.  It didn't take much time, as you can see remnants of breakfast are still in the background.  All in all, it was an easy project, and I didn't worry about being too exact because a bunch of 3-year-olds are just going to flog it to death in a couple days.


First, cut a penguin shape out of a corrugated cardboard box.  The beauty of this is that you can make it large or small.  This party is only going to have 6 kids, so mine was on the small side. I freehanded the drawing, cut it out, and then traced my cut out to make the other side of the piñata.


Now, this penguin shape is also the universal symbol of Darth Vader and the Space Shuttle.  In fact, I almost bought the Darth Vader cake pan at A.C. Moore (about $8 with a coupon), but then I realized that I really had too much on my plate for this weekend, and I ordered a cake instead of making my own.  However, for those of you with more time on your hands, a small investment can fuel at least 3 boy birthday parties.


Next I cut the side of a cereal box and used it to make more strips of cereal box the same size (I also cut off the end tabs).  You could make the strips wider to make your piñata thicker, but again, it was a small party, and I didn't feel like measuring.


I used masking tape to build up the sides of the piñata.  You don't need to make it super sturdy, as you want the 3-year-olds to bust through it eventually.  In fact, I even deliberately made some weak spots near the bottom.  Shh, don't tell.  If you are making this for a party of beer-guzzling males, make it stronger.


One place I did make it sturdy was at the top where I was going to put the hanger.  I cut an extra piece of cereal box and taped it to where the opening flap was hinged (where you put the candy in - don't forget to leave this opening!) and poked holes for the hanger on each side of the fold.


I glued tissue paper around the whole thing.  This doesn't need to be beautiful;  it just needs to hide any cardboard that might otherwise peek through the crepe paper.


I glued two strips of crepe paper all the way around the outside.


Next, I glued the crepe paper concentrically on the front and back.  Just keep going around and around, mushing it into shape as you go.


 I added features made from construction paper, and I drew the eyes on.


A wire tie is a good hanger, or you can twist some coat hanger wire into a loop.  Looky at all the candy inside!!!


I glued the flap shut (Keep in mind that this was two days before the party, so the glue had time to firm up.) and then masking taped it, adding a strip of crepe paper to cover the seam.  Done!


25 June 2012

Hollister Knit Top to Preschooler's Dress PLUS Rosette Tutorial PLUS the Proper Spelling of "Voilà"


Okay, I admit it, I have never set foot in a Hollister store.  I have nothing against Hollister.  I do value being able to see and breathe while I shop, but no biggie.  Oh, and I'm 36.

However, I did manage to snag this cute top while shopping at $5 bag day at a local rummage sale:


Which is almost like shopping at Hollister, I would imagine.

I was so happy when it fit me, but, hey, I'm 36.  And also I did not want to buy a special undergarment just to go under said garment, so I thought it better to make it into a frock for the girl cub.  First, I cut off the sleeves and the back, leaving the nice ribbed collar intact.


Then I turned it inside out and stitched the collar ribbing together where the shoulder seams had been to make a halter.  I cut off the excess and turned it right side out, and then I pinned and topstitched the sides (where the sleeves had been) all the way up and around the halter and down the other side.  I used this opportunity to angle the sides in quite a bit to fit the chest of a 5-year-old.


I cut off the excess fabric, made a little pleat in the back, and folded and pinned the back elastic to the inside and topstitched it.


Holy color enhance, Batman!  Okay, so now the rosette...

I've seen plenty of rosette tutorials around, but I wanted mine to be not so tightly wound and also not have hot glue all over it (for comfort's sake!), so I made my own.  I cut my fabric scrap from the shirt back I had removed, 2.5" X 11" or so.


I folded it in half the long way and stitched one end closed.  I used a long stitch length to make a gathering stitch all the way down the side.  I gathered, especially tightly on the closed end, and then knotted the threads.  At this point, I started singing, "Come on Eileen" because it reminded me of a Scrunchy I had in Junior High.  I turned it right side out with a chopstick, tucked the open ends closed and stitched it shut.  No need to make it too pretty on this end.


Ah, now some hand stitching...


Locating the inner corner of the more tightly gathered end, I tried not to poke my leg.


I stitched down through the corner, coiled it to meet the next layer and stitched through the inner edge, pulling it tight.  After going through a couple more layers, "floofing" it as I went (Yes, that is a technical term!), I made sure to catch the inner corner of the other end, pull the thread tight, and knot it.


And VOILÀ!!!!! a rosette.  And now for a moment of honesty...

I hand stitched the rosette to the dress in a strategic location so as to hide the weirdness from the seam ripper.  O.o

I made an oops the first time I sewed down the side.  I feel better now that I got that off my chest.


DD loves this dress.  I might have to take it up another inch or so in the halter, though, because when she wears it, she says, "Mommy, this dress is too big.  It almost shows This Part!"  (while stretching neckline down and pointing to nipple).  5-year olds.  *shakes head*

01 June 2012

Flower Pillow Tutorial


This project began in my mind about 5 years ago, and I even bought the fabric almost that long ago.  I had seen a flower-shaped pillow in a magazine, and I wondered what would happen if the petals were formed separately and also what would happen if they were formed from simple shapes like squares.  This form fascinated me also, because it is almost an optical illusion, an impossible 3-faced polyhedron, only squishy.  :)

So then, 5 years later, I started working on it.  That's kind of how a lot of projects go around here.  A few days ago, I cut out the squares and started sewing.  And now my daughter has a flower pillow, 5 years in the making.  Of course, this will only take you a couple hours.  Especially since it is undoubtable that you are better at sewing than I am!  And since I am not a very experienced seamstress, this tutorial might be silly for some of you, but this is the way it made sense to me.  Here goes...


You need 1/4 yard EACH of 3 coordinating fabrics, each cut into five 8 1/2" by 8 1/2" squares.  You could make this "scrappy" by using squares of lots of different fabrics, and you could certainly make the squares larger or smaller if you want.  I just used these measurements to fit nicely in a 1/4 yard.  If you use fat quarters, you'll need 2 of each fabric, because only 4 squares fit on one fat quarter.  Of course, if you don't care to have all the same fabrics on on side of the flower, you could do this with 4 fat quarters total, since you need 15 squares total.

You'll also need some large buttons or yo-yos or something for the middle of the flower.  I used the make-your-own covered button thingies and some scraps of my fabrics.  And you will need lots and lots of stuffing.  A ridiculous amount, in fact.


So, you'll need to press your squares in half, on the diagonal, with the right side facing out.  This is just to make sewing easier.  Also for the sake of making things easier, we'll call the green dot fabric #1, the multi-colored flower fabric #2, and the black and white flower fabric #3.


Place a square of #1 and #2 together, right sides together, lining up the pressed diagonals.  Starting at a corner that does NOT have a crease, stitch a 1/4" seam along one side of the squares, stopping right on the crease (and backstitch a little at that point).  Here I am, almost at the crease:


Now flip the whole thing over so you can start at the same corner and stitch down the adjacent side, also stopping at the crease.  The seam I just stitched is at the top of this picture:


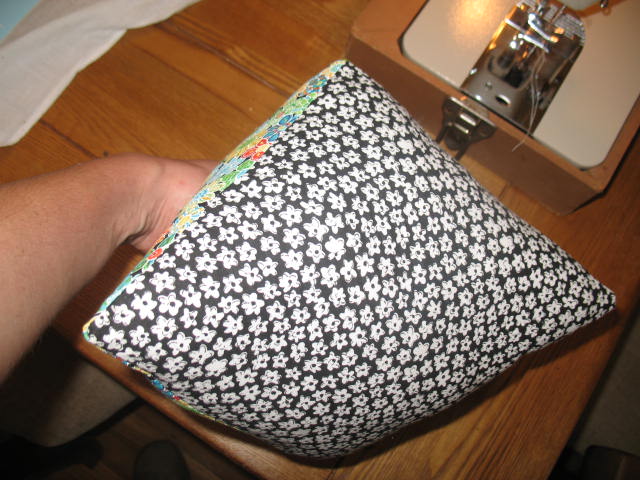
Now turn the squares so that the seams you just sewed are to the left, and the right side of the project can be opened like a book.  Turn the top "page" so that fabric #1 is folded to the left and fabric #2 is exposed on the right.  Place a square of fabric #3 on top, right side down, again aligning the creases.  Starting from the right-hand corner (not on a crease), join fabrics #3 and #2 in the same way, stopping at the crease, then flipping to repeat along the other edge.


Then flip the "pages" so all the sewn seams are on the left and a single layer of each of fabrics #1 and #3 are on the right.  Join #1 and #3 in the same way, leaving an opening on the last seam to turn right side out and stuff.


Turn the whole thing right side out, and get a small, freshly washed child to help you poke the corners into points with a chopstick and put in the stuffing.


Stitch the stuffin' hole closed.  Now make four more just like it.


Grab two of the pillows and join them with several thicknesses of strong thread at the corners where all three fabrics come together.  I chose to line mine up all the same way, but you could make it scrappy and jumble up the fabrics here.  Just make sure you are joining the corners where three fabrics come together.


Repeat until all your ducks are in a row and they take up more room on the couch than you do.


Now loop it around so you can join the first and last corners in the same way.


Perform beta test.  This pillow looks and feels just like it did in my head five years ago.  I love it when a plan comes together!


Stack up all the points in the middle of your "flower" and stitch them together with several thicknesses of strong thread.  It's okay if this looks like a hot mess.  It will be covered up by a button, pouf, yoyo, or the like.  Ultimately, these stitches must be strong enough for your kids to put their arms through the cool little gaps in between the petals without wrecking the pillow.  Add something to the middle for looks, and you're done!!!  (In retrospect, my button needs to be much bigger, but I wanted to publish this before it took me 5 more years to decide on the center.)